Traffic Car
How To Create
To start creating traffic vehicles, follow the instructions below based on your desired physics and architecture type.
MonoBehaviour-Based Traffic (Hybrid Mono)
Note
Before starting, ensure that World simulation type is set to Hybrid mono in the global General settings.
Open the Car Prefab Creator tool from the Unity toolbar:
Spirit604/CityEditor/Car Prefab Creator.In the Prefab tab, set Car type to Traffic and drag & drop your vehicle models (make sure source models do not contain any default Colliders, Rigidbodies, or Wheel Colliders).
In the Save tab, set Entity type to Hybrid entity mono physics.
Choose your controller integration:
- For Arcade (built-in sample):
Set Controller type to Arcade Heavy Mass.
Set your preset/paths in the Save tab.
Click Scan.
Adjust body/wheel offsets in the Prefab Info tab, and press Create.
After generation, ensure the raycast layer in ArcadeVehicleController matches your Ground layer.
- For Custom user controller:
Set Controller type to Custom user.
Create and assign an adapter script implementing the IVehicleInput interface to link traffic logic with your custom controller (see Input Info and the VehicleInput Example Code).
Click Scan & Create buttons.
Once generated, the vehicles are automatically added to the vehicle collection and your selected preset by default.
Find the Hub object in your scene and press the Copy To Subscene button (this is required to synchronize the active presets between the main scene and the subscene).
Open your EntitySubScene, locate the TrafficCarEntityPoolBakerRef component on both the main scene and the subscene, and make sure the correct preset is assigned.
(Optional) To prevent your player-controlled car from pushing or glitching through AI traffic, attach the CarPlayerBlocker component to the generated vehicle hull prefab and configure its physics layer.
Standard DOTS Traffic (Simple / Custom Physics)
Open the Car Prefab Creator tool from the Unity toolbar:
Spirit604/CityEditor/Car Prefab Creator.Drag & drop your source prefabs, configure common settings, choose your physics type (Simple Physics or Custom Physics), and adjust body/wheel offsets in the Prefab Info tab to ensure the model aligns correctly. Follow the detailed generator steps inside the Car Prefab Creator guide.
Once generated, the vehicles are automatically added to the vehicle collection by default. You can open the collection to ensure they appear in the list.
Make sure that your active traffic preset includes these new vehicles.
Open the global Traffic settings and ensure the Entity type matches your choice (e.g., Simple physics entity).
Find the Hub object in your scene and press the Copy To Subscene button (this is required to synchronize the active presets between the main scene and the subscene).
Open your EntitySubScene, locate the TrafficCarEntityPoolBakerRef component on both the main scene and the subscene, and verify that the correct preset is assigned.
Adjust the specific traffic parameters of the created vehicles based on their physics type:
For Simple physics.
For Custom physics.
Vehicle Physics Types
Custom Physics
Entities that are moved by the custom physical system.
Hybrid Entity Custom Physics & Pure Entity Custom Physics types refer to this.
Authoring components
Vehicle Authoring

Wheel

- Cast type:
Ray : raycast by ray.
Collider : raycast by collider (collider size based on wheel radius and width).
Suspension
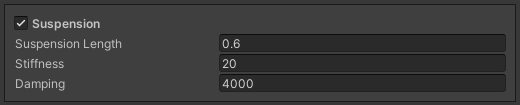
Friction

Transient Forces
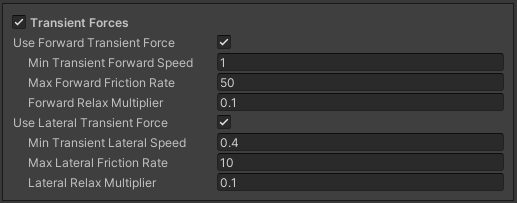
Transient force is required to hold the car on an inclined ramp during manual braking.
Brakes

Engine

Scene Settings
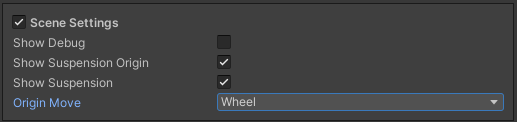
- Origin move:
Disabled : disabled handle.
Wheel : on/off handle for wheel origin.
Suspension origin : on/off handle for suspension origin.
Suspension : on/off handle for suspension and wheel origin.
Template Settings
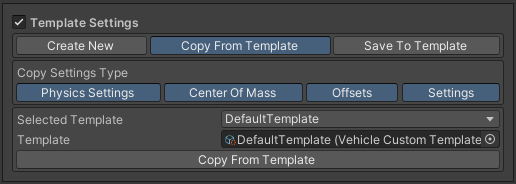
- Tabs:
Create new : create a new template settings.
Copy from template : copy settings from the selected template.
Save to template : save settings to the selected template.
- Copy settings type:
Physics settings : copy the physics settings (mass, damping, gravity) of the PhysicsBody component.
Center of mass : copy the center of mass local position of the PhysicsBody component.
Offsets : copy the local offset of the wheels.
Settings : copy the settings of the VehicleAuthoring component.
Wheel Refs

PhysicsBody

PhysicsShape

Example
Simple Physics
Entities moved by the simple physical system (by simply adding the physics velocity to the physics body).
Hybrid entity simple physics & Pure entity simple physics types refer to this.
Authoring components
CarWheelAuthoring

PhysicsBody
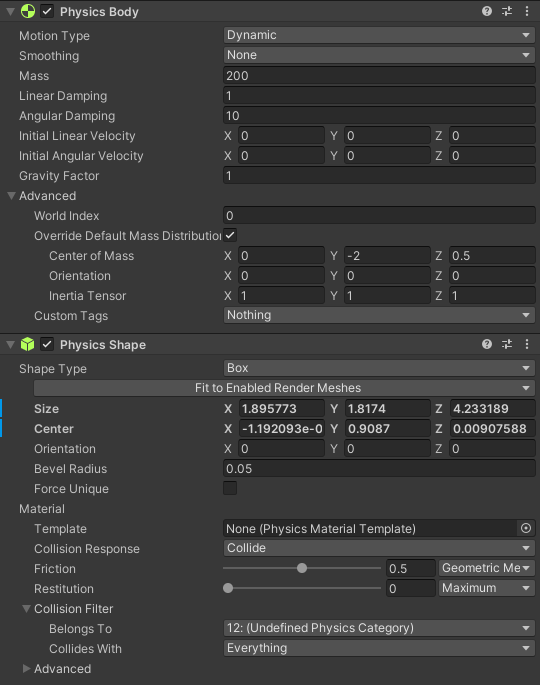
PhysicsShape

Example
Optional components if the car moves with physics.
No Physics
Pure entities that moved by transform system without physics.
Contains the same non-physics components as Simple Physics (e.g., CarWheelAuthoring).
Pure entity no physics type refer to this.
Hybrid Mono
Before using this vehicle type, make sure that you selected World simulation type to Hybrid mono in the General settings.
Hybrid entities that moved by custom monobehaviour controller.
Hybrid entity mono physics type refer to this.
Full creation process is described in the How To Create section above.
Input Info
Throttle [1] : forward motion.
Throttle [-1] : reverse motion.
Throttle [0] : hand brake.
Throttle [-0.9] : braking, for example, if the current speed is higher than permitted. (the value can be changed in the Traffic settings)
Steering [-1, 1].
VehicleInput Example Code
public class UVC_adapter : MonoBehaviour, IVehicleInput
{
        // Replace by your custom controller script.
        // The example uses a "Universal Vehicle Controller".
        // https://assetstore.unity.com/packages/tools/physics/universal-vehicle-controller-plus-176314
        public UVC_AIControl carControllerInput;

        public float Throttle
        {
                get => carControllerInput.Acceleration;
                set
                {
                        if (value > 0)
                        {
                                carControllerInput.SetAcceleration(value);
                                carControllerInput.SetBrakeReverse(0);
                                carControllerInput.SetHandBrake(false);
                        }
                        else
                        {
                                carControllerInput.SetAcceleration(0);
                                carControllerInput.SetBrakeReverse(Mathf.Abs(value));

                                if (value == 0)
                                        carControllerInput.SetHandBrake(true);
                        }
                }
        }

        public float Steering { get => carControllerInput.Horizontal; set => carControllerInput.SetSteer(value); }
        public bool Handbrake { get => carControllerInput.HandBrake; set => carControllerInput.SetHandBrake(value); }

        public void SwitchEnabledState(bool isEnabled)
        {
                carControllerInput.enabled = isEnabled;
        }
}
Car Player Blocker
The CarPlayerBlocker component is designed specifically for Hybrid Mono vehicles. It prevents a custom player physics controller from pushing or moving AI traffic vehicles upon collision.
It achieves this by dynamically creating an independent kinematic collider on a dedicated physics layer. This layer forces the player’s controller to recognize the traffic car as an immovable obstacle, while the traffic car itself ignores this internal blocker collider to prevent self-jittering.
Note
This component works only for vehicles with the Hybrid entity mono physics type. It does not affect Pure DOTS entities.
How It Works
Editor Generation: The editor script copies the dimensions and center boundaries of your vehicle’s main source collider (supports
BoxColliderorMeshCollider).Layer Isolation: It places this newly generated box collider onto a custom physics layer (e.g., PlayerBlocker).
Kinematic Rigidbody: A kinematic
Rigidbodyis automatically attached to the blocker object, making it completely unyielding to the player’s physical forces.Collision Filtering: At runtime (in
Awake), the script automatically configures Unity’s physics engine to ignore collisions between the vehicle’s driving colliders and this blocker collider.
Inspector Parameters
PhysicsSwitcher component to properly reset and synchronize collider states during culling.BoxCollider slot.Step-by-Step Configuration
Follow these steps to set up the blocker for your vehicles:
Create a New Layer: Open your Unity project settings and add a new layer (e.g., name it
PlayerBlocker).Attach the Component: Add the
CarPlayerBlockercomponent to your vehicle’s hull prefab.- Configure the Blocker:
Assign the Source Collider and the Physics Switcher.
Set the Player Blocker Layer to the layer you created in Step 1.
Click the Create button in the inspector. This will spawn a child GameObject named
PlayerBlockerwith a box collider and a kinematic rigidbody.
- Configure the Layer Collision Matrix:
Navigate to Project Settings -> Physics.
Locate the Layer Collision Matrix grid.
For the
PlayerBlockerlayer, untick all checkboxes except for the layer used by your Player character/vehicle controller.
Note
This matrix setup ensures the blocker collider interacts only with the player and remains completely invisible to traffic, NPCs, raycasts, and ground physics layers.
Components
CarEntityAdapter

Component to synchronize gameobject & entity, also to switch physics & scripts of the vehicle when cull state changes with PhysicsSwitcher & ScriptSwitcher components.
Note
You can turn off traffic physics culling in the Traffic settings.
PhysicsSwitcher
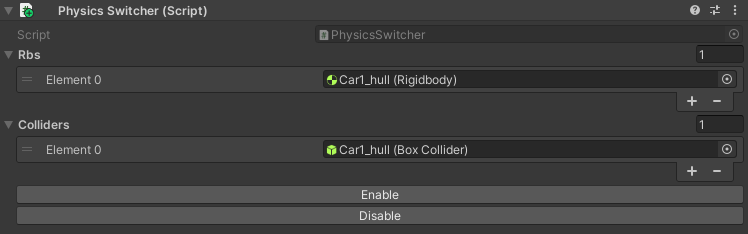
Component to on/off physics of the vehicle.
ScriptSwitcher

Component to on/off scripts of the vehicle.
Common Authoring Components
TrafficCarEntityAuthoring

Main component of traffic entity [required].
NavMeshObstacleAuthoring
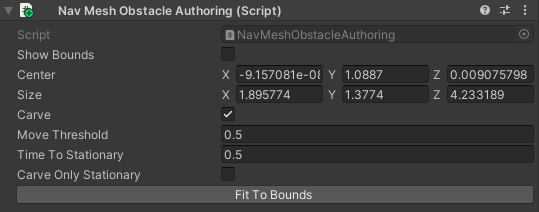
NavMeshObstacleData entity component for runtime loading of NavMeshObstacle objects for pedestrian navigation. Make sure, that option is enabled in the traffic settings [optional].
CarSoundAuthoring

Component for vehicle sounds [optional].
CullState Info
States
Culled : entity is destroyed.
- CloseToCamera:
Cull physics (if enabled) : custom physics & simple physics temporarily converted to no physics entity.
Cull wheel (if enabled) : disabling wheel rotating.
InVisionOfCamera : entity fully enabled.
Parking
Car parking consists of the following states:
Entering parking states
The car has chosen the path containing the parking node.
The car links the parking node to prevent it from being selected by other cars (the list of linked nodes can be customized here).
When the car reaches the parking node, the car position correction is activated for precise parking (if disabled in the parking config, this step is skipped).
The engine stopping state is activated (if enabled in the stopping engine config & vehicle is in view of the player’s camera).
Pedestrian gets out of the car.
Exiting parking states
The Pedestrian enters the pedestrian parking node, if available.
The parking car removes link with TrafficNode.
The engine ignition system is triggered (if enabled in ignition config).
Once the car has started the engine, the car starts moving.
Avoidance
Avoidance is used to resolve situations where vehicles become stuck and cannot clear their path. Currently, it is triggered in the following scenarios:
A traffic deadlock where cars are blocked behind one another (avoidance config).
A frontal deadlock where two cars meet head-on and block each other’s path (collision config).

Head-on deadlock example.

Resolving deadlock with avoidance example.
Note
Test scene example.
Entity Selection
Entity can be retrieved using one of these methods:
Pure DOTS
Create a new gameobject with EntitySelectionService component
Use world position to get the nearest entity for that position.
public Entity TryToSelectEntity(Vector3 worldPosition)
{
        return EntitySelectionService.Instance.SelectEntity(worldPosition, EntityType.Traffic, 1f);
}
Hybrid Mono
Entity can be retrieved if the car has a collider:
private Entity GetEntity()
{
        Entity entity = Entity.Null;

    if (Physics.Raycast(transform.position, Vector3.forward, out hit, 1.0f))
        {
                var hybridEntityRef = hit.collider.GetComponent<IHybridEntityRef>();
                entity = hybridEntityRef.RelatedEntity;
        }

        return entity;
}
Rail Movement
The Rail movement is used to drive the vehicle precisely along the path, which can be useful in small enclosed parking areas, for example. To enable rail movement, tick on the Rail parameter in the path settings. Open the rail config to adjust the Rail parameters (DOTS only).
Note
Enabled by default for trams.
Obstacle Detection
Raycast
Config
Debugger
Modes
Hybrid mode : raycast is activated only when the selected targets are close to the car.
Raycast only : raycasts are sent constantly.
To define raycast targets for Hybrid or Raycast only modes, redefine the GetTargetQuery method in the TrafficCarRaycastObstacleTargetQueryProvider class, which returns the EntityQuery of the targets.
public static EntityQuery GetTargetQuery(
                   SystemBase sourceSystem,
                   TrafficCarDetectObstacleMode trafficCarDetectObstacleMode,
                   TrafficCarDetectNpcMode trafficCarDetectNpcMode,
                   out CollisionFilter tempRaycastCollisionFilter,
                   out CollisionFilter raycastAlwaysCollisionFilter);
Hybrid Mode Filter : collision filter of hybrid raycast mode.
Raycast Only Filter : collision filter of raycast only mode.
Note
You can also dynamically change the raycast target for Hybrid mode by adding or removing the TrafficCustomRaycastTargetTag component.
Layer constants are stored in the ProjectConstants.cs file.
Obstacle Avoidance
If you want the traffic to avoid obstacles, follow these steps:
Make sure that obstacle detection is set to either Hybrid or Raycast in the Traffic config.
Ensure that Advanced avoidance is enabled in the Collision config.
Make sure that the traffic Raycast config includes an obstacle layer.
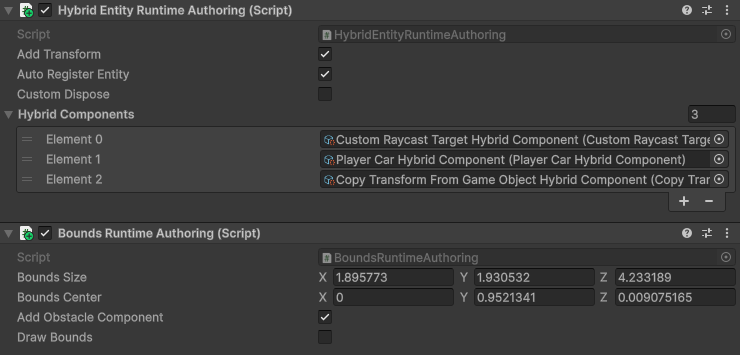
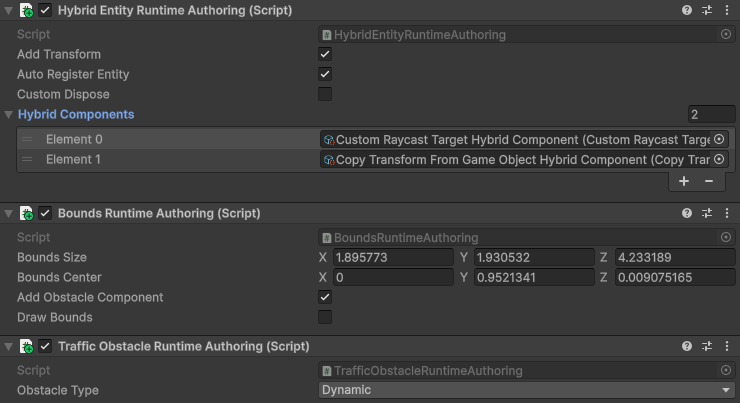
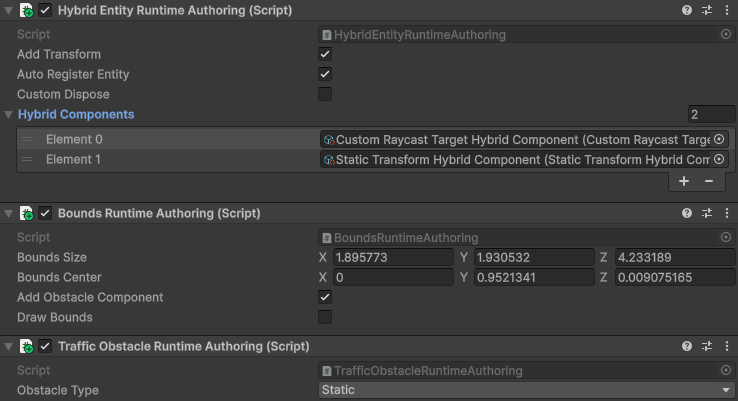
Add components to the obstacle object from the example below, depending on the type of obstacle.
Player Character
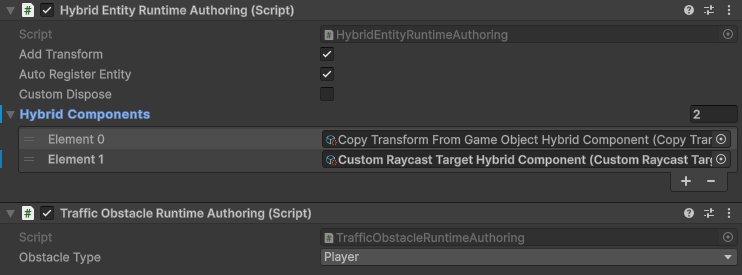
Note
Make sure that Player Npc Hybrid Component is removed.
Player Car
Dynamic Obstacle
Static Obstacle
Left-hand Drive
To make the traffic left-hand drive:
Find & open
ProjectConstantsscript.Change the
LaneHandDirectionvariable to-1.Note
Changing this parameter will only affect newly created scenes. Old scenes with a different lane direction will not work.
Pathfinding
Custom Point
To set a custom destination for a specific traffic car, do the following:
Create a new gameobject with
EntitySelectionServicecomponent.Create a new gameobject with
TrafficCustomPathServicecomponent.Use this sample code:
private void Awake()
{
        PathHashMapSystem.Register();
}

public void SetEntity(Vector3 trafficPosition, Vector3 destination)
{
        var trafficEntity = EntitySelectionService.Instance.SelectEntity(trafficPosition, EntitySelectionService.EntityType.Traffic, 2f);
        TrafficCustomPathService.Instance.SetFollowPath(trafficEntity, destination);
}
Use the
OnStatusUpdatedcallback inTrafficCustomPathServiceto listen to the current state of the traffic car’s pathfinding.
Custom Node
To set a custom node destination for a specific traffic car, do the following:
Create a new gameobject with
EntitySelectionServicecomponent.Create a new gameobject with
TrafficCustomPathServicecomponent.Use this sample code:
private void Awake()
{
        PathHashMapSystem.Register();
}

public void SetEntity(Vector3 trafficPosition, Vector3 destination)
{
        var trafficEntity = EntitySelectionService.Instance.SelectEntity(trafficPosition, EntitySelectionService.EntityType.Traffic, 2f);
        var destinationPath = PathHashMapSystem.GetClosestPath(destination);

        TrafficCustomPathService.Instance.SetFollowPath(trafficEntity, destinationPath);
}
Use the
OnStatusUpdatedcallback inTrafficCustomPathServiceto listen to the current state of the traffic car’s pathfinding.As an alternative, you can check the
TrafficPathSelectorprefab for an interactive user-selected path used in the RuntimeTileRoad Demo scene (runtime sample should be imported & RUNTIME_ROAD scripting define added).