Pedestrian
How To Create
Hybrid Legacy Skin
A Hybrid legacy skin is a hybrid entity that combines the default GameObject (with animator) and the DOTS entity.
Factory
Open PedestrianSkinFactory in the scene.
Hub/Pools/Npc/Pedestrian/PedestrianSkinFactory
Enable the Show Add New Prefab Settings.
Drag & drop source prefabs into the New Prefabs field.
Customize the prefab names.
Click the Try To Add Prefabs.
If necessary, configure Ragdoll and assign to the Pedestrian Skin Factory Data (make sure Ragdoll is enabled).
Note
Each Hybrid legacy pedestrian prefab should have PedestrianReferences component.
Animations
By default, each pedestrian has a PedestrianBaseController animator.
Animation List:
Animation name |
Parameters |
Value |
When it starts |
|---|---|---|---|
Walking |
|
|
By default |
Running |
|
|
By default |
Idle |
|
|
By default |
Stand To Sit |
|
|
By default |
Sitting Idle |
Stand To Sit is completed |
||
Sit To Stand |
|
|
Sitting Idle |
Talking 1, 2, 3 |
|
|
By default |
How To Use
Entities
.WithoutBurst()
.ForEach((
        Entity entity,
        Animator animator) =>
{
        animator.SetFloat("yInput", 1f);
}).Run();
- Used in systems:
LegacyAnimatorSystem
LegacyAnimatorCustomStateSystem
LegacyTalkingAnimatorSystem
Pure GPU Skin
Pure GPU skin is a pure entity that combines the GPU texture animations and the DOTS entity.
How To Create
Create Animation Collection from the project context .
Spirit604/Animation Baker/Animation Collection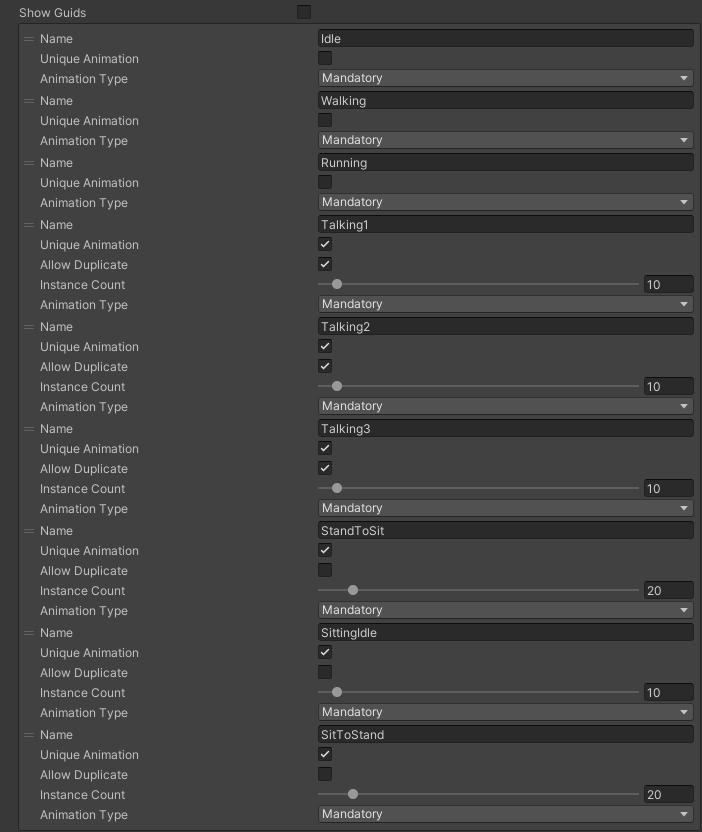
Add and customize desired animations data.
Open in the scene PedestrianCrowdSkinFactory.
Hub/Pools/Npc/Pedestrian/PedestrianCrowdSkinFactoryAssign Animation Collection to PedestrianCrowdSkinFactory.

Click + to show New Entry panel.

Select created Baked Animation Sheet Data.

Open factory settings.
Select Entry Key Source Type to Selected Mesh Name (or select Custom if you want to enter the name manually).

Assign Default Atlas Texture (if selected pedestrians have the same texture material). [optional step]

One by one click Select and Add entry button. Or click the Add all entries button to add all entries in the container.

Turn on the Find Related Animations button.

- Generate Animation Material.
Assign main texture of selected model [if missing].
Press the Generate button.

Select entry & assign animations:
- Animation baker binding:
Bind the animation on the baking texture step.
- Manual way:
In the inspector, select the animation that you want to assign to the selected character.

Press the Assign button according to the selected animation in Animation Texture Data.
- Automated way:
Automatic assignment works if the animation in the list matches (or partially matches) the animation name in the selected container.
Press the Auto Bind Animations button.
Make sure, that all animations are assigned.

Assign animations to each entry in the same way.
- Add custom optional animations for the desired pedestrians [optional step].
In the Animation Collection add new Optional animations.
Tick on Show optional animation popup in Pedestrian crowd skin factory settings.
Add desired optional animations in the character list of the factory.
Bind added animations.
Assign Ragdolls. [optional step].

How To Use
    private NativeHashMap<SkinAnimationHash, HashToIndexData> hashToLocalDataLocalRef;

    void ISystemStartStop.OnStartRunning(ref SystemState state)
    {
            hashToLocalDataLocalRef = CrowdSkinProviderSystem.HashToLocalDataStaticRef;
    }

    [BurstCompile]
    void ISystem.OnUpdate(ref SystemState state)
    {
            var switchAnimJob = new SwitchAnimJob()
            {
                    HashToLocalData = hashToLocalDataLocalRef,
            };

            switchAnimJob.Schedule();
    }

[BurstCompile]
public partial struct SwitchAnimJob : IJobEntity
{
            [ReadOnly]
            public NativeHashMap<SkinAnimationHash, HashToIndexData> HashToLocalData;

            void Execute(
            Entity entity,
            ref SkinUpdateComponent skinUpdateComponent,
            EnabledRefRW<UpdateSkinTag> updateSkinTagRW)
            {
                    // Some animation hash calculated from animation name & AnimUtils.StringToHash method
                    var animHash = 54335363;
                    AnimEntitiesUtils.UpdateAnimation(ref skinUpdateComponent, ref updateSkinTagRW, animHash);
            }
            }
}
- Used in systems:
GPUAnimatorSystem
GPUAnimatorCustomStateSystem
GPUTalkAnimatorSystem
Animation Texture Data
Data about baked animations in texture (How to create).

Crowd GPU Custom Animator
The Crowd GPU Custom animator is used for transitions between baked animations (implemented by CrowdAnimatorTransitionSystem system).
- How To Create Transition:
Open in the scene CrowdGPUAnimatorAuthoring.
Hub/Configs/BakerRefs/Settings/CrowdGPUAnimatorAuthoring
Create an Animator Data Container from the project context and assign it to the animator (if required).
Assign Animation Collection the same as in the PedestrianCrowdSkinFactory.
Press the Open Animator button.
Create a new transition layer (if needed).
Enter the name of the trigger in the StartNode.
Create and connect AnimationNode and TransitionNodes.

Start sit transition example.

Sitout transition example.
Copy & paste the generated hash from the AnimatorContainer into the code (usage example).

How To Use
Simple switch animation code example:
Entities
.WithoutBurst()
.WithNone<UpdateSkinTag>()
.WithAll<HasSkinTag, GPUSkinTag>()
.ForEach((
        Entity entity,
        ref GPUSkinUpdateComponent gpuSkinUpdateComponent) =>
{
        gpuSkinUpdateComponent.NewAnimationHash = PedestrianGPUAnimationsConstans.SittingIdle_Anim_Hash; //int animation hash
        commandBuffer.SetComponentEnabled<UpdateSkinTag>(entity, true);
}).Schedule();
Complex animation transition code example:
public partial class PedestrianSittingGPUAnimatorExampleSystem : SystemBase
{
        private const int StartSitAnimHash = -1880722739; //StartSit hash trigger

        private BeginPresentationEntityCommandBufferSystem entityCommandBufferSystem;
        private CrowdTransitionProviderSystem crowdTransitionProviderSystem;

        protected override void OnCreate()
        {
                base.OnCreate();
                entityCommandBufferSystem = World.GetOrCreateSystemManaged<BeginPresentationEntityCommandBufferSystem>();
                crowdTransitionProviderSystem = World.DefaultGameObjectInjectionWorld.GetOrCreateSystemManaged<CrowdTransitionProviderSystem>();
        }

        protected override void OnUpdate()
        {
                var transitions = crowdTransitionProviderSystem.Transitions;

                if (!transitions.IsCreated)
                {
                        return;
                }

                var commandBuffer = entityCommandBufferSystem.CreateCommandBuffer();

                Entities
                .WithoutBurst()
                .WithReadOnly(transitions)
                .WithAll<HasSkinTag, GPUSkinTag>()
                .ForEach((
                        Entity entity,
                        ref AnimationTransitionData animationTransitionData) =>
                {
                        Entity animStateEntity = Entity.Null;

                        transitions.TryGetValue(StartSitAnimHash, out animStateEntity);

                        if (animStateEntity != Entity.Null)
                        {
                                animationTransitionData.CurrentAnimationState = animStateEntity;
                                commandBuffer.SetComponentEnabled<HasAnimTransitionTag>(entity, true);
                        }
                }).Schedule();

                entityCommandBufferSystem.AddJobHandleForProducer(Dependency);
        }
}
- Used in systems:
LoadGPUSkinSystem
CrowdAnimatorTransitionSystem
GPUSittingAnimatorSystem
Ragdoll
Ragdoll is created at the scene of the pedestrian’s death. Make sure ragdoll is enabled.
How To Create
Add all the colliders and rigidbodies to character according to the RagdollWizard tutorial.

RagdollWizard example.
Add the PedestrianRagdoll component.

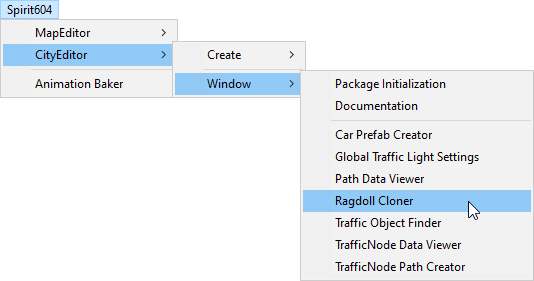
For the remaining characters, open the RagdollCloner tool.

Assign the source character created first and the target remaining characters.
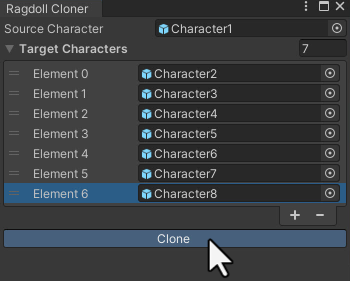
Click the Create button.
Assign the result to PedestrianHybridLegacyFactory or PedestrianCrowdSkinFactory depending on the type of rig you have chosen.
Note
Implemented by RagdollSystem.
Currently only collides with default colliders
Make sure, that the scene contains default colliders.
Read more info about the Physics Transfer Service on how to clone legacy colliders.
Common Info
Collision
In some cases pedestrians can get stuck in obstacles (vehicles), to solve this problem, adjust the Antistuck config.
States
Common Logic
Custom system set the next Action state in the NextStateComponent by utils method.
- bool NextStateComponent.TryToSetNextState(ActionState.WaitForGreenLight, ref destinationComponent)
Example method, if state can’t be set, then target swap back.
- bool NextStateComponent.TryToSetNextState(ActionState.WaitForGreenLight)
Example method without retargeting.
PedestrianStateSystem is checking NextStateComponent for non-default next Action state and checks if the list of available states contains that state.
Available state list for the current state can be defined here.
If state is available, set StateComponent to the new state and set Movement state according to Movement binding data.
- After the Movement state is set to a new state, the MovementStateChangedEventTag tag is enabled & new animation movement animation is running in the appropriate animation system.
For Legacy skin LegacyAnimatorSystem.
For GPU skin GPUAnimatorSystem.
If you want to set the Custom animation for pedestrian read this.
How To Change
    // Switch state example

[WithDisabled(typeof(WaitForGreenLightTag))]
[BurstCompile]
public partial struct CheckTrafficLightJob : IJobEntity
{

void Execute(
    ref DestinationComponent destinationComponent,
    ref NextStateComponent nextStateComponent,
    EnabledRefRW<WaitForGreenLightTag> waitForGreenLightTagRW,
    EnabledRefRW<CheckTrafficLightStateTag> checkTrafficLightStateTagRW)
    {
            // Tag is triggering system
            checkTrafficLightStateTagRW.ValueRW = false;

            //Example red traffic light flag logic
            bool redLight = true;

            if (redLight)
            {
                    // If the next state is available, start waiting for a green light.

                    if (nextStateComponent.TryToSetNextState(ActionState.WaitForGreenLight, ref destinationComponent))
                    {
                            // Some logic

                            waitForGreenLightTagRW.ValueRW = true;

                            // If the entity has a custom animation for this state, use the 'AnimatorStateExtension.AddCustomAnimatorState' method
                    }
                    else
                    {
                            // Otherwise return to previous destination, for example
                    }
            }
            else
            {
                    // Not red traffic light then set cross the road state
                    nextStateComponent.TryToSetNextState(ActionState.CrossingTheRoad);
            }
    }
    }
Custom State System
    // Custom state system example

[BurstCompile]
public partial struct CustomStateJob : IJobEntity
{

    void Execute(
    ref StateComponent stateComponent,
    ref NextStateComponent nextStateComponent,
    EnabledRefRW<WaitForGreenLightTag> waitForGreenLightTagRW)
    {
            // Some logic for waiting traffic light
            bool greenLight = true;

            if (!greenLight)
            {
                    // Some logic while waiting for the green light
            }

            // If the traffic light is green or another system has changed state, leave current system
            var leaveState = greenLight || !stateComponent.HasActionState(in nextStateComponent, ActionState.WaitForGreenLight);

            if (leaveState)
            {
                    waitForGreenLightTagRW.ValueRW = false;

                    if (greenLight)
                    {
                            nextStateComponent.TryToSetNextState(ActionState.CrossingTheRoad);
                    }
                    else
                    {
                            // Otherwise logic if the state is interrupted with another system
                    }
            }
    }
    }
Custom Animator State
If you want to override the default motion animation, use these methods:
Method #1
This method is used when GPU pedestrians require complex animation transitions.
Add the custom anitator state by using the utils method:
AnimatorStateExtension.AddCustomAnimatorState(ref EntityCommandBuffer commandBuffer, Entity entity, CustomAnimatorState customAnimationState)And add hash of your animation in the following systems.
- For Legacy skin.
LegacyAnimatorCustomStateSystem
- For GPU skin.
GPUAnimatorCustomStateSystem
If the pedestrian already in the custom animator state use the method:
AnimatorStateExtension.ChangeAnimatorState(ref EntityCommandBuffer commandBuffer, Entity entity, CustomAnimatorState customAnimationState, bool immediateUpdate = true)
After all the custom animation is complete, use the method to return the default animation system:
AnimatorStateExtension.RemoveCustomAnimator(ref EntityCommandBuffer commandBuffer, Entity entity)
Note
- For an example of a system, please read the script below:
BenchStateSystem.cs.
Method #2
If the entity has the Idle Movement state, you can change the animation directly by using the following methods:
For Legacy skin by changing the Animator state directly (example).
Note
- For an example of a system, please read the script below:
SwitchTalkingKeySystem.cs.
Movement State
Default
Idle
Walking
Running
Action State
Default : no state.
Idle : when a pedestrian is waiting.
MovingToNextTargetPoint : when going from PedestrianNode to PedestrianNode (excluding crosswalk).
WaitForGreenLight : when a pedestrian is waiting for a green traffic light.
CrossingTheRoad : when a pedestrian goes crossing a crosswalk.
ScaryRunning : activated when a pedestrian runs away in a panic (for example, the sound of a gunshot or the death of a pedestrian nearby).
Sitting : when a pedestrian is sitting.
Talking : when a pedestrian is talking.
Note
You can edit state logic here.
Configs
Pedestrian Spawner Config

Pedestrian Settings Config

Skin Type
Rig show only in view : rig skin will be loaded in the camera’s view area.
Rig and dummy : rig will be in the camera’s view, and the dummy skin will be out of the camera’s view.
Dummy show only in view : dummy skin will be loaded in the camera’s view area.
Rig show always : rig skin will be loaded when the entity is created and will exist until it is destroyed.
Dummy show always : dummy skin will be loaded when the entity is created and will exist until it is destroyed..
No skin : entities without a skin will be created.
Rig Type
Hybrid legacy : hybrid entity with animator component.
Pure GPU : pure entity with gpu animations.
Entity Type
No physics : pedestrian not contains PhysicsShape component.
Physics : pedestrian contains PhysicsShape component.
Common Settings
Obstacle Avoidance Type
Collision type
Calculate : collision is calculated manually (for NoPhysics type).
Physics : collision is calculated with Unity.Physics (for Physics type).
Disabled
NavAgent Config
Config for NavMesh navigating.
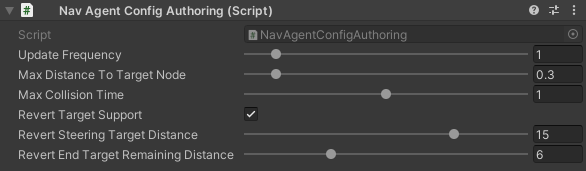
- Revert target supportif steering target is much further than final target with a given value the target will be reverted.
Revert steering target distance : distance to steering target logic for target return.
Revert end target remaining distance : distance to final target logic for target return.
Obstacle Local Avoidance Config
Config for Local Avoidance navigating.

- Obstacle avoidance method:
Simple : is able to avoid only 1 object.
Find neighbors : multiple objects close to each other are grouped as one (more costly in performance).
Antistuck Config
Anti-stuck config for pedestrians stucked in a collision.

Trigger Config

- Trigger data:
- Fear Point Trigger :
Impact trigger duration : duration of the trigger on the pedestrian.
Scary Trigger Config
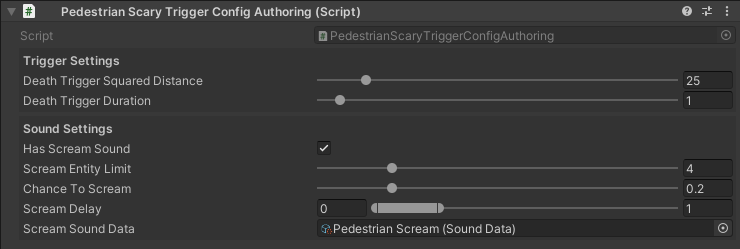
Trigger settings
Sound settings
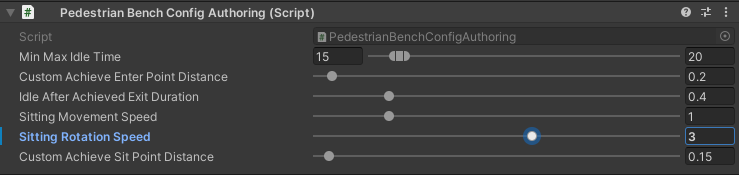
Bench Config
Common Sound Config
Common pedestrian sound settings

State Authoring
State Dictionary

- State type:
Default : the state proccessed by PedestrianStateSystem system (code processing for state should be there PedestrianStateSystem.cs:144).
External system : the state proccessed by external system (code processing for state should be in the separate system).
Additive : additive state flag adds to the current state and is processed by the External system.
Additive any : additive state flag adds to the current state and is processed by the External system & ignores available next state flags.
Movement State Binding Dictionary
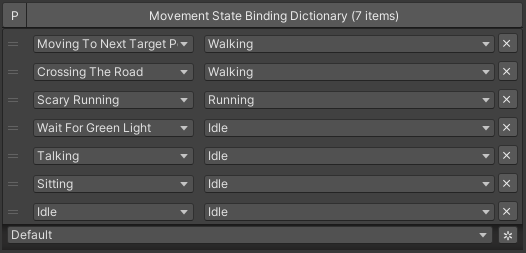
Contains data - which Movement state is assigned after the Action state is assigned.
Note
Read more the state info & available states.