Project Requirements
- Minimum Unity version:
2022.3.21+ or 6.0.23+ (except 2022.3.40 - 2022.3.50).
- Required packages:
Entities.Graphics 1.2.0 [not required for Mono cars & Hybrid legacy pedestrians]
Unity.Physics 1.2.0 [not required for Mono cars]
Custom Physics Authoring [not required for Mono cars]
- Asset store packages:
Limitations
WebGL not supported.
Built-in RP only works with Mono cars & Hybrid legacy pedestrians.
Vehicles with trailers or wagons are not currently supported for NoPhysics.
Animator with skeletal bone animation in pure DOTS space is currently available if you have Rukhanka Animation System; otherwise it’s available only for hybrid entities with Animator approach or pure entities with GPU animations.
NavMesh surface obstacles only calculated with NavMeshObstacle.
Ragdoll currently only collides with default colliders. For DOTS Ragdolls, you need the Rukhanka Animation System.
Package Installation
Steps
Download & import from the Unity Asset Store .
First time initialization window will appear automatically or you can open it manually from the toolbar
604Spirit/CityEditor/Window/Package Initialization.
Click Load Packages to start downloading the packages required for this tool.
If you get the error ‘No git executable was found’, install git on your PC (how to install) or download these packages from the store.
Note
- Recommended custom packages [optional from version v1.1.0 onwards, but is recommended for advanced users]:
Extenject (com.svermeulen.extenject) - library for injecting dependencies (Extenject).
Note
- Script define symbols required for the project:
DOTS_CITY
UNITY_PHYSICS_CUSTOM
After the packages have been downloaded & installed, if the console has nunit.framework or Burst compilation errors, restart Unity.
Click Load Optional Packages to start downloading the optional packages (optional package, git required).
Note
- Optional packages:
Reese’s DOTS Navigation (com.reese.path) - Reese’s DOTS navigation package for navigating on the NavMesh (original git) (the project uses the 604spirit’s fork version).
Note
- Script define symbols required for the project:
REESE_PATH
Warning
If you get the error ‘No git executable was found’, read this.
Download the optional assets from the Asset Store [from version v1.1.0, steps 7-9 are optional, a built-in audio engine is available by default]:
Note
- Optional asset store packages:
FMOD - asset store plugin for game sounds FMOD
Note
- Script define symbols required for the project:
FMOD
After that, press the Add Scripting Define button.
Install the FMOD sound settings.
Note
If the project is created from scratch, the Pipeline, Layer settings, and Project settings will be configured automatically. You can skip the next steps and proceed directly to Step 13.
If you are updating an existing project, follow steps 10 to 12 manually inside the initialization window.
[Manual Setup] Open the Pipeline tab, press the Import Graphics button if you want to use the demo pipelines (optional step), otherwise set Rendering path to Forward+ in your pipeline settings.
[Manual Setup] Open the Layer settings tab, select the layers to import according to your use case, and press the Apply button.

Note
The TrafficNode & PedestrianNode layers are required for TrafficNode & PedestrianNode prefabs accordingly; others are optional. Read more about project layers here.
[Manual Setup] Open the Project settings tab & press Add all scenes to build if you want to add demo scenes to your project.
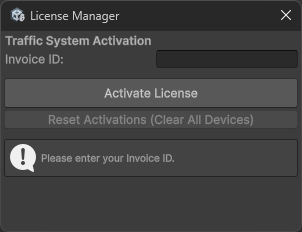
In the appeared License Manager window, enter your invoice ID .
The next step is to set up the new scene or launch the existing Demo or Demo Mono scene.