Pedestrian
How To Create
Hybrid Legacy Skin
A Hybrid legacy skin is a hybrid entity that combines the default GameObject (with animator) and the DOTS entity.
Factory
Open PedestrianSkinFactory in the scene.
Hub/Pools/Npc/Pedestrian/PedestrianSkinFactory
Enable the Show Add New Prefab Settings.
Drag & drop source prefabs into the New Prefabs field.
Customize the prefab names.
Click the Try To Add Prefabs.
If necessary, configure Ragdoll and assign to the Pedestrian Skin Factory Data (make sure Ragdoll is enabled).
Note
Each Hybrid legacy pedestrian prefab should have PedestrianEntityRef component.
Animations
By default, each pedestrian has a PedestrianBaseController animator.
Animation List:
Animation name |
Parameters |
Value |
When it starts |
|---|---|---|---|
Walking |
|
|
By default |
Running |
|
|
By default |
Idle |
|
|
By default |
Stand To Sit |
|
|
By default |
Sitting Idle |
Stand To Sit is completed |
||
Sit To Stand |
|
|
Sitting Idle |
Talking 1, 2, 3 |
|
|
By default |
- Used in systems:
LegacyAnimatorSystem
LegacyAnimatorCustomStateSystem
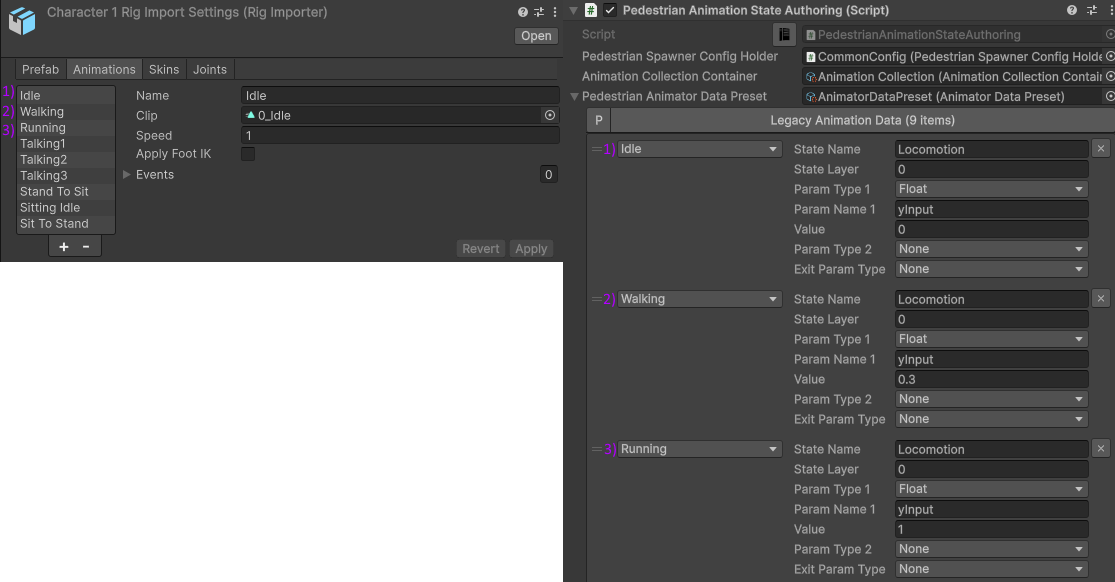
Animation authoring
Add your animation to AnimationState script file.
In the scene find:

Hub/Configs/PedestrianConfigs/PedestrianAnimationStateAuthoring.
Add your animation to the list & enter condition to start the animation from the assigned Animator:

State name : state name of the animation in the Animator.
State layer : number of the layer where the animation is stored in the Animator.
Param 1 : first parameter to start animation in the Animator.
Param 2 : second parameter to start animation in the Animator [optional].
Exit param : parameter to exit current animation in the Animator [optional].
How to play animation described here.
Pure GPU Skin
Pure GPU skin is a pure entity that combines the GPU texture animations and the DOTS entity.
How To Create
Create GPU prefabs in the Animation baker tool.
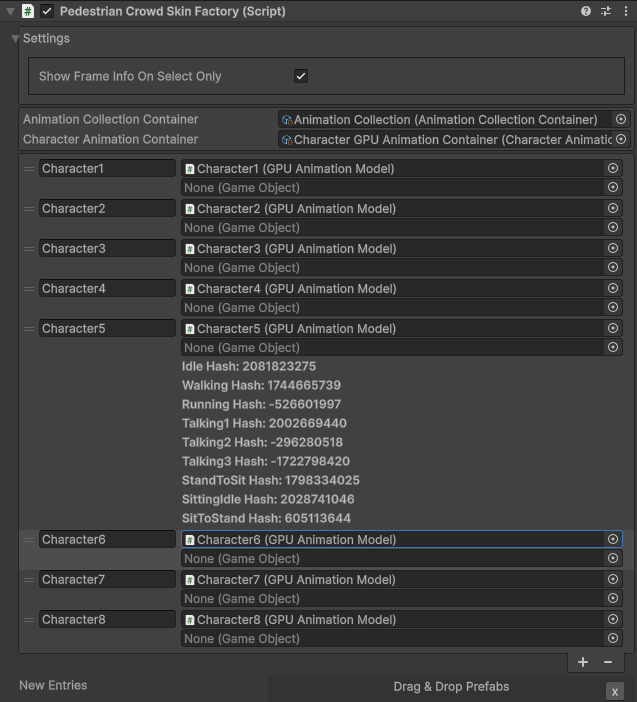
Open in the scene PedestrianCrowdSkinFactory.
Hub/Pools/Npc/Pedestrian/PedestrianGPUSkinFactoryClick + to show New Entry panel.

Drag & drop prefabs.

Result example:
Assign Ragdolls [optional step].

- Used in systems:
GPUAnimatorSystem
GPUAnimatorCustomStateSystem
Animation authoring
Add your animation to AnimationState script file.
In the scene find:
Hub/Configs/PedestrianConfigs/PedestrianAnimationStateAuthoring.
Add binding in the list (AnimationState is a key, Animation from Animation collection is a value)
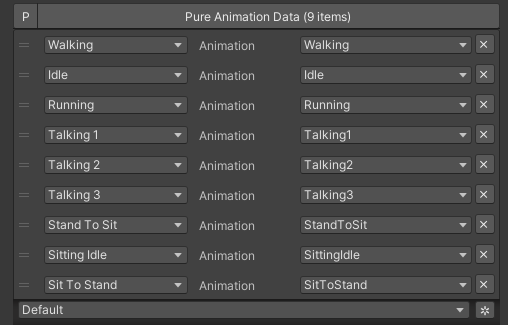
Example.
How to play animation described here.
Crowd GPU Custom Animator
The Crowd GPU Custom animator is used for transitions between baked animations (implemented by CrowdAnimatorTransitionSystem system).
- How To Create Transition:
Open in the scene CrowdGPUAnimatorAuthoring.
Hub/Configs/BakerRefs/Settings/CrowdGPUAnimatorAuthoring
Create an Animator Data Container from the project context and assign it to the animator (if required).
Assign Animation Collection the same as in the PedestrianCrowdSkinFactory.
Press the Open Animator button.
Create a new transition layer (if needed).
Enter the name of the trigger in the StartNode.
Create and connect AnimationNode and TransitionNodes.

Start sit transition example.

Sitout transition example.
Copy & paste the generated hash from the AnimatorContainer into the code (usage example).

- Used in systems:
GPUAnimatorCustomStateSystem
Hybrid and GPU
New hybrid GPU mode that allows you to mix hybrid animator models for near and GPU animation for far at the same time.
How To Create
Create Legacy pedestrians.
Add desired animations in the Animation state authoring for Legacy pedestrians.
Create GPU pedestrians.
Add desired animations in the Animation state authoring for GPU pedestrians.
Make sure that the number & the order of Legacy & GPU of the models are the same in the factories (PedestrianSkinFactory & PedestrianGPUSkinFactory).
How to play animation described here.
Cull state
InViewOfCamera: Hybrid legacy skin is enabled.
CloseToCamera: GPU skin is enabled.
Hybrid On Request And GPU
By default, the entity is animated by the GPU until a Hybrid skin is requested.
How To Create
Create entity as Hybrid and GPU pedestrians.
Hybrid skin is enabled if the entity disables the PreventHybridSkinTagTag tag, to switch back to GPU, enable PreventHybridSkinTagTag tag again.
Hybrid Shape GPU
Hybrid Shape GPU skin is a hybrid entity animated on GPU in DOTS & has hybrid monobehaviour collider to interact with pedestrians in a familiar way.
How To Create
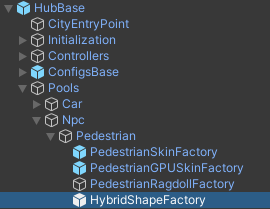
Create GPU pedestrians.
The hybrid shape can be edited here:
Rukhanka
Pure entities animated with Rukhanka Animation System in DOTS.
How To Create
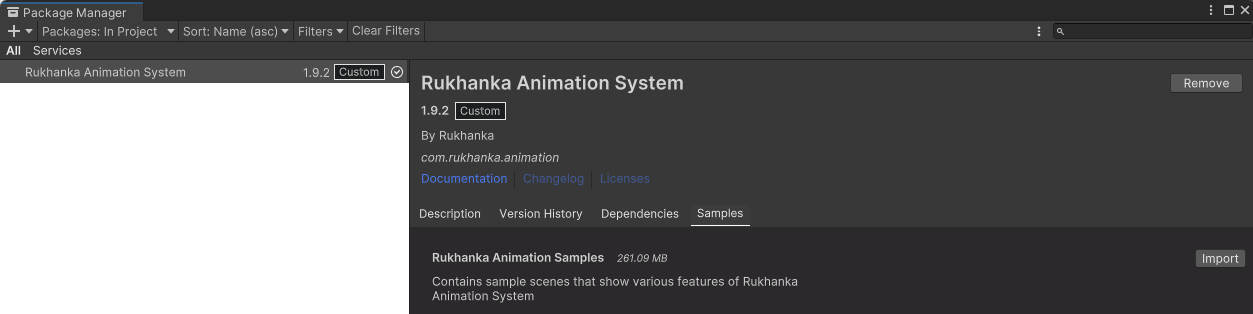
Import Rukhanka samples (it uses AnimatedLitShader URP shader from the sample).
Unpack RukhankaSample prefabs:

Create a new gameobject on the scene & add an AnimationCullingConfig component & assign the main camera to it.
Create a pedestrian prefab with the Animator, add PedestrianAuthoring & RigDefinitionAuthoring components & assign desired prefab here:

Animation taken from Animation state authoring as for Hybrid legacy pedestrian.
If you get a
Blob asset System.String System.Type::get_FullName() with hash 'Unity.Entities.Hash128' is corrupted.error, try closing the subscene (uncheck the box next to EntitySubscene) & start the scene again.
Rukhanka Hybrid
Hybrid entities animated with Rukhanka Animation System with hybrid monobehaviour collider & rigidbody to control or interact with pedestrians in a familiar way.
How To Create
Import Rukhanka samples (it uses AnimatedLitShader URP shader from the sample).
Unpack RukhankaSample prefabs:
Create a new gameobject on the scene & add an AnimationCullingConfig component & assign the main camera to it.
Create a pedestrian prefab with the Animator, add PedestrianAuthoring & RigDefinitionAuthoring components & assign desired prefab here:
The hybrid shape can be edited here:
Animation taken from Animation state authoring as for Hybrid legacy pedestrian.
If you get a
Blob asset System.String System.Type::get_FullName() with hash 'Unity.Entities.Hash128' is corrupted.error, try closing the subscene (uncheck the box next to EntitySubscene) & start the scene again.
How To Control
You can control the Rukhanka Hybrid npc with the monobehaviour script:
Make sure that HybridShapeFactory prefab contains RukhankaEntityAdapter.
Temporarily remove the entity from the built-in DOTS simulation.
Methods to control animation in the same way as the Unity animator, but using RukhankaEntityAdapterBase component.
Example:
public struct AnimationControlExample : MonoBehaviour
{
        private RukhankaEntityAdapterBase adapter;

        private void Awake()
        {
                adapter = GetComponent<RukhankaEntityAdapterBase>();
        }

        private void SetTriggerByName(string name)
        {
                adapter.SetTrigger(name);
        }

        private void SetTriggerByHash(string name)
        {
                var hash = RukhankaUtils.GetHash(name);
                adapter.SetTrigger(hash);
        }
}
How To Attach
If you need to attach some gameobject weapon e.g:
Add RukhankaHybridBoneAnchorAuthoring to entity prefab.
In RukhankaHybridBoneAnchorAuthoring assign bone that you want to attach.
Attach the anchor with the local index:
public struct AttachExample : MonoBehaviour
{
        [SerializeField] private GameObject attachment;

        private RukhankaEntityAdapterBase adapter;

        private void Awake()
        {
                adapter = GetComponent<RukhankaEntityAdapterBase>();
        }

        private void Attach()
        {
                // Attach to anchor with local index 0
                adapter.AttachToBone(attachment, 0);
        }

        private void Release()
        {
                adapter.ReleaseAttachment(0);
        }
}
Animation Event
In RigDefinitionAuthoring component enable Has Animation Events option.
Then, use this sample code:
public struct AnimationEventExample : MonoBehaviour
{
        [SerializeField] private string desiredAnimationEventName;

        private RukhankaEntityAdapterBase adapter;
        private uint desiredAnimationEventHash;

        private void Awake()
        {
                adapter = GetComponent<RukhankaEntityAdapterBase>();
                adapter.OnAnimationEvent += RukhankaEntityAdapter_OnAnimationEvent;

                desiredAnimationEventHash = RukhankaUtils.GetHash(desiredAnimationEventName);
        }

        private void RukhankaEntityAdapter_OnAnimationEvent(AnimationEventComponent animationEvent)
        {
                if (animationEvent.nameHash == desiredAnimationEventHash)
                {
                        // Take action
                }
        }
}
Animatron
Pure entities animated with Animatron in DOTS.
How To Create
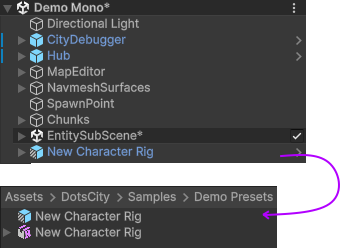
Unpack AnimatronSample prefabs:

Imported sample you can find here.
Create a new Rig asset from the project context menu
Create/Rig.In the created rig, drap & drop your FBX file of the pedestrian into the prefab field. Then, press Apply button.

Drag & drop animation clips into the animation list. Order of animations should match Animation authoring, animation name can be any. Then, press Apply button.
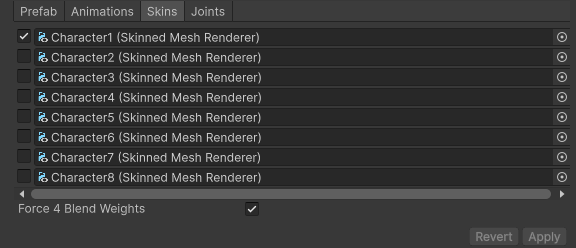
In the Skins tab, only keep the skin that is being used for the character.
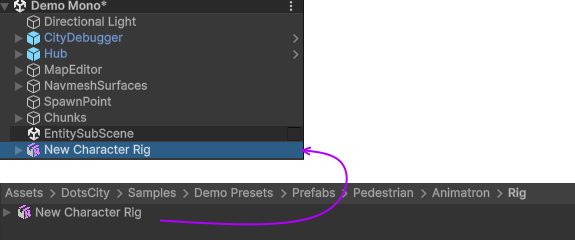
Drag & drop created rig into the scene.
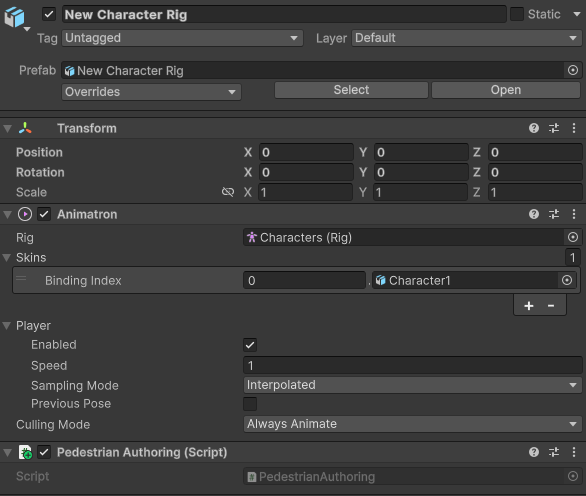
Add PedestrianAuthoring component to the created object in the scene.
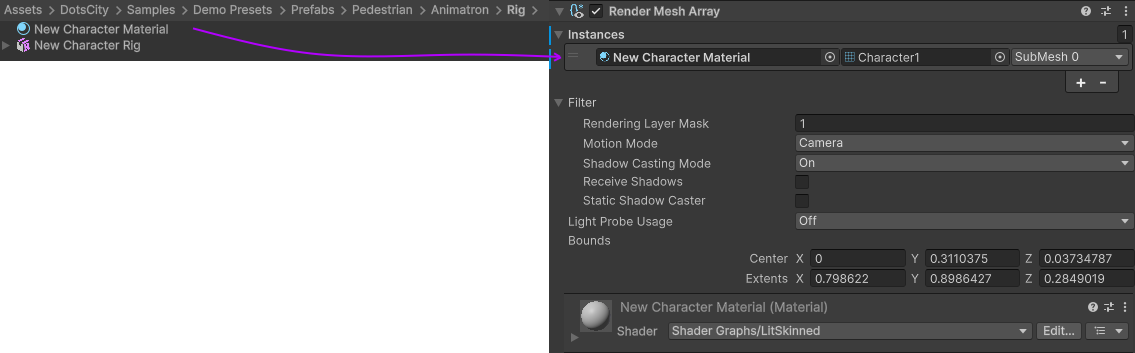
Select Render Mesh Array of the character.
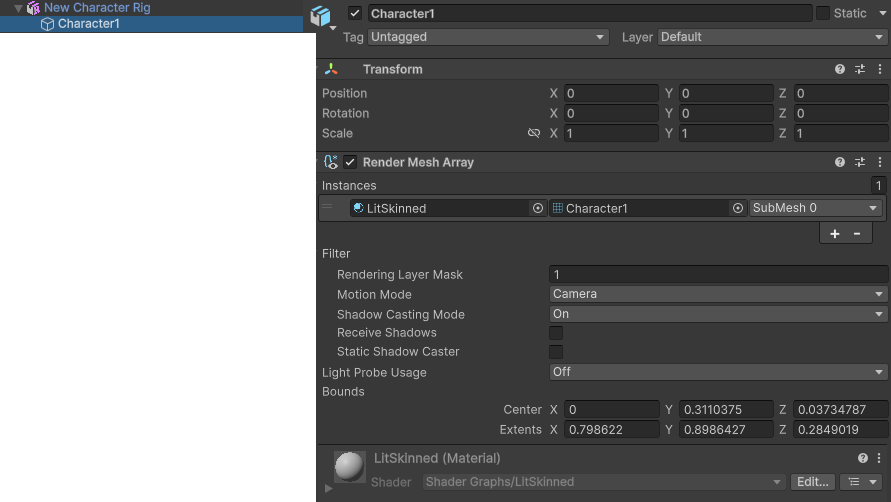
Create a new material & assign
Shader Graphs/LitSkinnedshader to it.
Assign your texture to the BaseMap.

Drag & drop the created material into the material field of the Render Mesh Array component.
Then, drag & drop created prefab of the scene into the project view.
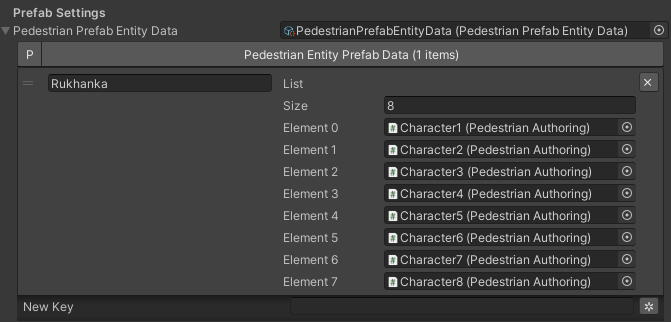
Add the result prefab to the Prefab container.
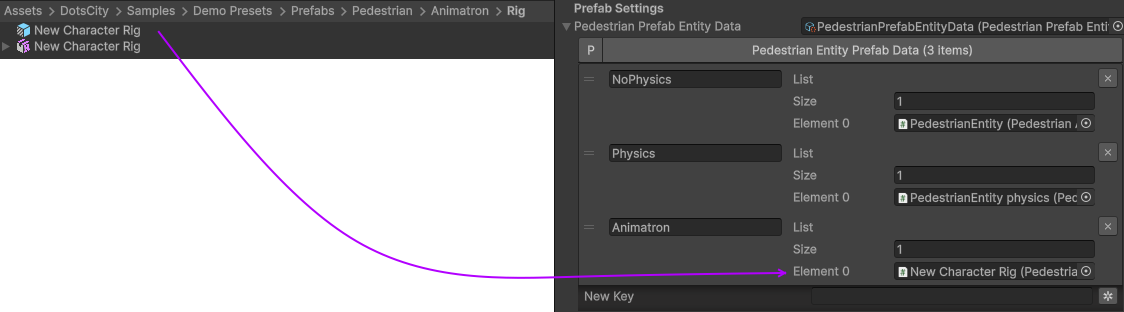
In the Pedestrian settings select Animatron rig type.
To quickly create new characters, simply duplicate the Rig asset and assign a new FBX file with different skins. Then, drag and drop it into the scene as before, save it as a prefab, and assign it to the Prefab container.
Animatron Hybrid
Hybrid entities animated with Animatron in DOTS.
How To Create
Follow steps of Animatron.
Add AnimatronEntityAdapter component to NpcHybridShape prefab.

In the Pedestrian settings select Animatron hybrid rig type.
Now, you can disable the pedestrian from the DOTS simulation at any time and handle it manually via the AnimatronEntityAdapter component.
Runtime Attachment
Add AnimatronRuntimeAttachment component to your attachment.
Use
SetAttachmentmethod of AnimatronRuntimeAttachment to attach to the AnimatronEntityAdapter with the specified Joint name.
Ragdoll
Ragdoll is created at the scene of the pedestrian’s death. Make sure ragdoll is enabled.
How To Create
Add all the colliders and rigidbodies to character according to the RagdollWizard tutorial.

RagdollWizard example.
Add the PedestrianRagdoll component.

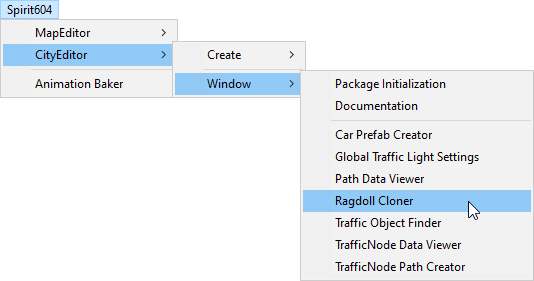
For the remaining characters, open the RagdollCloner tool.

Assign the source character created first and the target remaining characters.
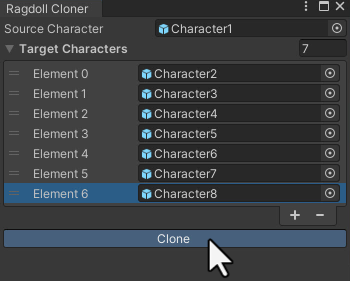
Click the Create button.
Assign the result to PedestrianHybridLegacyFactory or PedestrianCrowdSkinFactory depending on the type of rig you have chosen.
Note
Implemented by RagdollSystem.
Currently only collides with default colliders
Make sure, that the scene contains default colliders.
Read more info about the Physics Transfer Service on how to clone legacy colliders.
Animation
Custom Animation
To handle custom animation, follow these steps:
- Add custom animations in the Animation state authoring for pedestrians.
Hybrid skin (if you are using Hybrid animations).
GPU skin (if you are using GPU animations).
Add custom animator state by code:
    // IJobEntity entity example
void Execute(
    Entity entity,
    ref AnimationStateComponent animationStateComponent)
{
            // Some condition
            bool condition = true;

            if (condition)
            {
                    // Replace 'AnimationState.StandToSit' with your animation.
                    AnimatorStateExtension.AddCustomAnimatorState(ref CommandBuffer, entity, ref animationStateComponent, AnimationState.StandToSit);
            }
}
Change to new state if required, code:
    // IJobEntity entity example
void Execute(
    Entity entity,
    ref AnimationStateComponent animationStateComponent)
{
            // Some condition
            bool condition = true;

            if (condition)
            {
                    // Replace 'AnimationState.SitToStand' with your animation.
                    AnimatorStateExtension.ChangeAnimatorState(ref CommandBuffer, entity, ref animationStateComponent, AnimationState.SitToStand);
            }
}
After all the custom animations have been played, turn off the custom animation state.
    // IJobEntity entity example
void Execute(
    Entity entity,
    ref AnimationStateComponent animationStateComponent)
{
            // Some condition
            bool condition = true;

            if (condition)
            {
                    AnimatorStateExtension.RemoveCustomAnimator(ref CommandBuffer, entity);
            }
}

    .. note::
            For an example of a system, please read the script below:
                    * BenchStateSystem.cs.
States
Common Logic
Custom system set the next Action state in the NextStateComponent by utils method.
- bool NextStateComponent.TryToSetNextState(ActionState.WaitForGreenLight, ref destinationComponent)
Example method, if state can’t be set, then target swap back.
- bool NextStateComponent.TryToSetNextState(ActionState.WaitForGreenLight)
Example method without retargeting.
PedestrianStateSystem is checking NextStateComponent for non-default next Action state and checks if the list of available states contains that state.
Available state list for the current state can be defined here.
If state is available, set StateComponent to the new state and set Movement state according to Movement binding data.
If you need to implement custom logic, such as enabling a custom tag for a pedestrian entity when it reaches a node with your own custom type, you can modify the code in the SelectAchievedTargetUtils.ProcessAchievedTarget method.
- After the Movement state is set to a new state, the MovementStateChangedEventTag tag is enabled & new animation movement animation is running in the appropriate animation system.
For Legacy skin LegacyAnimatorSystem.
For GPU skin GPUAnimatorSystem.
If you want to set the Custom animation for pedestrian read this.
How To Change
    // Switch state example

[WithDisabled(typeof(WaitForGreenLightTag))]
[BurstCompile]
public partial struct CheckTrafficLightJob : IJobEntity
{

void Execute(
    ref DestinationComponent destinationComponent,
    ref NextStateComponent nextStateComponent,
    EnabledRefRW<WaitForGreenLightTag> waitForGreenLightTagRW,
    EnabledRefRW<CheckTrafficLightStateTag> checkTrafficLightStateTagRW)
    {
            // Tag is triggering system
            checkTrafficLightStateTagRW.ValueRW = false;

            //Example red traffic light flag logic
            bool redLight = true;

            if (redLight)
            {
                    // If the next state is available, start waiting for a green light.

                    if (nextStateComponent.TryToSetNextState(ActionState.WaitForGreenLight, ref destinationComponent))
                    {
                            // Some logic

                            waitForGreenLightTagRW.ValueRW = true;

                            // If the entity has a custom animation for this state, use the 'AnimatorStateExtension.AddCustomAnimatorState' method
                    }
                    else
                    {
                            // Otherwise return to previous destination, for example
                    }
            }
            else
            {
                    // Not red traffic light then set cross the road state
                    nextStateComponent.TryToSetNextState(ActionState.CrossingTheRoad);
            }
    }
    }
Custom State System
If you want to temporarily control certain pedestrians with monobehaviour read this article or see the sample code below to control pedestrians with DOTS script:
    // Custom state system example

[BurstCompile]
public partial struct CustomStateJob : IJobEntity
{

    void Execute(
    ref StateComponent stateComponent,
    ref NextStateComponent nextStateComponent,
    EnabledRefRW<WaitForGreenLightTag> waitForGreenLightTagRW)
    {
            // Some logic for waiting traffic light
            bool greenLight = true;

            if (!greenLight)
            {
                    // Some logic while waiting for the green light
            }

            // If the traffic light is green or another system has changed state, leave current system
            var leaveState = greenLight || !stateComponent.HasActionState(in nextStateComponent, ActionState.WaitForGreenLight);

            if (leaveState)
            {
                    waitForGreenLightTagRW.ValueRW = false;

                    if (greenLight)
                    {
                            nextStateComponent.TryToSetNextState(ActionState.CrossingTheRoad);
                    }
                    else
                    {
                            // Otherwise logic if the state is interrupted with another system
                    }
            }
    }
    }
Movement State
Default
Idle
Walking
Running
Action State
Default : no state.
Idle : when a pedestrian is waiting.
MovingToNextTargetPoint : when going from PedestrianNode to PedestrianNode (excluding crosswalk).
WaitForGreenLight : when a pedestrian is waiting for a green traffic light.
CrossingTheRoad : when a pedestrian goes crossing a crosswalk.
ScaryRunning : activated when a pedestrian runs away in a panic (for example, the sound of a gunshot or the death of a pedestrian nearby).
Sitting : when a pedestrian is sitting.
Talking : when a pedestrian is talking.
Note
You can edit state logic here.
Entity Customization
By default, 1 entity prefab shared across all pedestrian, but if you want customize (change weight, add custom entity component etc.) certain entity for certain skin:
Open Pedestrian settings.
Duplicate the entity prefab. Set unique customization for the prefab authorings (the order of the entity prefabs within the prefab container should match that of the factory).
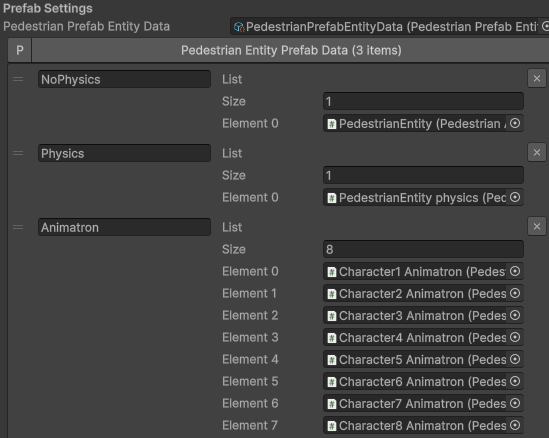
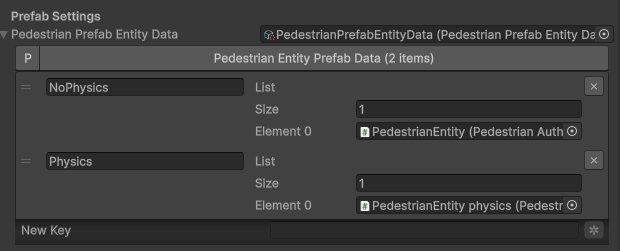
See the image below for an example of a prefab container (there are 2 prefabs, 1 for pedestrian, 1 unique for police)
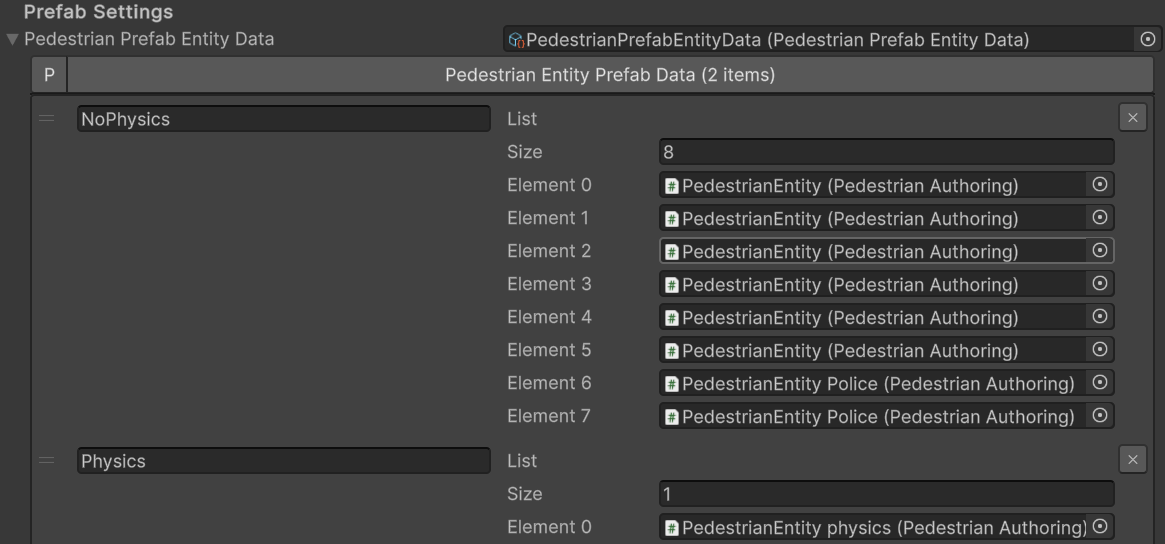
The number of entries of entities prefab in this scriptable object should match with the factory it uses (PedestrianSkinFactory for the hybrid pedestrians or PedestrianGPUSkinFactory for the GPU pedestrians)
User Custom Control & Interaction
If you need to temporarily take full control of specific Pedestrian in your own way, use this:
Get the desired entity using either method.
Use this sample code to temporarily remove/restore pedestrians from built-in DOTS systems.
PedestrianInteractUtils Methods
// Remove the pedestrian entity from the DOTS simulation. All custom states, locomotion & animation should be handled by custom user code using monobehaviour scripts.
PedestrianInteractUtils.RemoveFromSimulation(entity);
// Return the entity to the simulation. PedestrianInteractUtils.RestoreToSimulation(entity);
Interaction Mono Example
public class PedestrianInteractable : MonoBehaviour
{
        private IHybridEntityRef hybridEntityRef;
        private bool activated;

        public bool Activated => activated;

        private void Awake()
        {
                hybridEntityRef = GetComponent<IHybridEntityRef>();
        }

        /// <summary>
        /// Remove the pedestrian entity from the DOTS simulation. All custom states, locomotion & animation should be handled by custom user code using monobehaviour scripts.
        /// </summary>
        public bool Activate()
        {
                if (activated) return false;

                if (PedestrianInteractUtils.RemoveFromSimulation(hybridEntityRef.RelatedEntity))
                {
                        activated = true;
                }

                return activated;
        }

        /// <summary>
        /// Return the entity to the simulation.
        /// </summary>
        public bool Deactivate()
        {
                if (!activated) return false;

                if (PedestrianInteractUtils.RestoreToSimulation(hybridEntityRef.RelatedEntity))
                {
                        activated = false;
                }

                return !activated;
        }
}
Entity Selection
Entity can be retrieved using one of these methods:
Pure DOTS
Create a new gameobject with EntitySelectionService component
Use world position to get the nearest entity for that position.
public Entity TryToSelectEntity(Vector3 worldPosition)
{
        return EntitySelectionService.Instance.SelectEntity(worldPosition, EntityType.Pedestrian, 1f);
}
Hybrid Mono
Entity can be retrieved if the NPC has a collider:
private Entity GetEntity()
{
        Entity entity = Entity.Null;

    if (Physics.Raycast(transform.position, Vector3.forward, out hit, 1.0f))
        {
                var hybridEntityRef = hit.collider.GetComponent<IHybridEntityRef>();
                entity = hybridEntityRef.RelatedEntity;
        }

        return entity;
}
Runtime Custom NPC
The RuntimeCustomNpc component allows you to instantiate, initialize, and manage custom hybrid NPC entities at runtime within the DOTS-based city simulation. It connects standard Unity GameObjects (with Animators and Transforms) with corresponding High-Performance DOTS Entities.
Unlike pre-spawned crowd agents, a Runtime Custom NPC can be placed directly into a scene or spawned dynamically via script. It manages its own entity lifecycle, handles registration with the EntityManager, and provides clear toggle hooks for active simulation states (e.g., enabling/disabling locomotion and animation tracking).
Demo Sample
The package includes a pre-configured sample prefab to illustrate the correct setup:
Character Runtime Sample: A ready-to-use reference prefab that demonstrates how to layer custom runtime logic on top of the pedestrian simulation infrastructure.
Prefab Structure & Requirements
To ensure standard hybrid workflows and custom execution operate correctly, any custom runtime NPC prefab must include specific component references on its root GameObject.
Note
Make sure that Runtime Custom Npc is enabled in the General Settings config.
Since PedestrianEntityRef inherits directly from NpcHybridEntityRef, you only need to attach PedestrianEntityRef. Do not attach both components simultaneously.
Required Component Hierarchy:
PedestrianEntityRef: Required by the core simulation framework to recognize the object as a valid pedestrian agent and interface with standard conversion pipelines. It satisfies all requirements for tracking underlying DOTS entity lifecycles.
RuntimeCustomNpc: The driver script handling manual/automatic activation loops.
[Prefab Root]
├── Animator
├── PedestrianEntityRef (Required - Inherits from NpcHybridEntityRef)
└── RuntimeCustomNpc
How It Works
Entity Registration: On initialization (or via
autoCreateEntity), the component queries the unique custom prefab singleton (marked withCustomRuntimeNpcPrefabTag) and instantiates it.Settings Initialization: It extracts global configurations from the
PedestrianSettingsReferenceand seeds random parameter variations for the pedestrian entity.State Activation/Deactivation: You can dynamically add the NPC to or remove it from the active movement and pathfinding simulation loops at runtime, shifting control between MonoBehaviours and DOTS systems.
Component API Reference
Properties
autoCreateEntity (
bool): If enabled, automatically invokes the registration routine duringOnEnable.Activated (
bool): Read-only flag specifying whether the NPC is currently actively simulated in the world.
Public Methods
public void RegisterEntity()
Instantiates the entity representation from the custom NPC prefab, loads individual pedestrian configuration data, and pairs the GameObject’s transform with the entity.
public void UnregisterEntity()
Destroys the entity using the referenced PedestrianEntityRef (via its inherited hybrid reference) and clears the activation state.
public void ActivateNpc()
Activates the NPC agent within the live city ecosystem:
Binds the GameObject’s
Animatorto the entity.Snaps the entity’s position/rotation to the current GameObject coordinates.
Dynamically locates the nearest navigation path node using
NodeHashMapSystem.GetClosestNode.Assigns a starting
DestinationComponentand sets up internal system tags (e.g., enablingCopyTransformToGameObject) so that the entity drives the GameObject’s movement.
public void DeactivateNpc()
Suspends active simulation behavior for this NPC:
Detaches the
Animatorfrom the ECS architecture.Disables transform propagation components.
Re-enables
CustomRuntimeNpcTagand switches the component layout back to state-neutral positioning, handing control back to standard Unity workflows.
Usage Guide
Manual Activation Example
If you choose to control activation manually, uncheck Auto Create Entity in the inspector and trigger the lifetime states programmatically:
using UnityEngine;
using Spirit604.DotsCity.Gameplay.Npc;

public class CustomNpcController : MonoBehaviour
{
    [SerializeField] private RuntimeCustomNpc customNpc;

    void Start()
    {
        // Manually register the DOTS entity footprint
        customNpc.RegisterEntity();
    }

    public void TriggerNpcDeployment()
    {
        if (!customNpc.Activated)
        {
            // Move into active pathfinding simulation
            customNpc.ActivateNpc();
        }
    }

    public void RecallNpc()
    {
        if (customNpc.Activated)
        {
            // Suspend movement systems and take manual MonoBehaviour control
            customNpc.DeactivateNpc();
        }
    }
}
Integration with Pedestrian States
Once ActivateNpc() is called, the entity is fed directly into the system workflow described in the Pedestrian States documentation. It obtains destination markers, respects local avoidance data, and handles action/movement updates identically to standard ambient city pedestrians.
Temporary Ragdoll
The pedestrian temporary ragdoll system manages the physical behavior of pedestrians (NPCs) during collisions. It allows them to dynamically transition into a ragdoll state upon impact and automatically recover (stand back up) after a configured duration, provided it is safe to do so.
This feature is built using Unity DOTS (Entities) and supports a hybrid infrastructure to seamlessly switch between optimized GPU skinning and full GameObject-based physics components.
Gameplay Logic Example
To understand how health points and ragdoll states interact, consider the following lifecycle example:
Impact & Damage Calculation: If a living NPC (e.g., with 100 HP) is struck by a car, the physical force of the collision is multiplied by the
Force To Damage Multiplierand subtracted from the NPC’s health.State Evaluation:
If the remaining health drops to 0 or below, the NPC dies permanently.
If the remaining health is above 0, the NPC transitions into a temporary ragdoll state.
Temporary Invulnerability: While the NPC is lying on the ground in the ragdoll state, it is temporarily invulnerable to further damage. Attacks (such as shooting or subsequent vehicle impacts) will not reduce its health during this phase.
Recovery & Vulnerability Window: Once the
Recovery Durationexpires and safety checks pass, the NPC triggers the standing-up sequence. As soon as the character starts getting up, the invulnerability wears off. From this moment on, the NPC becomes fully vulnerable again, and any new damage can reduce its remaining health to 0, resulting in permanent death.
Enabling
The temporary ragdoll state is globally controlled via the central Pedestrian settings config. To make this functionality available for pedestrians, the following specific flags must be configured within these global configuration settings:
Has Ragdoll: This global toggle must be enabled to allow physical ragdoll interactions for pedestrians upon death or impact.
Allow Temporal Ragdoll: This setting explicitly activates the recovery feature. When enabled, it allows living NPCs with remaining health points to enter a temporary ragdoll state and subsequently stand back up, rather than being permanently incapacitated or destroyed.
Animator
When transitioning out of the ragdoll state, the system relies on Unity’s Mecanim Animator system (configured in controllers such as PedestrianBaseController) to handle the standing-up sequence.
State Transition: The transition from the default locomotion or fallen state into the GettingUp animation state is driven by the
GetUpfloat parameter.Activation Condition: The standing-up sequence triggers automatically when
GetUp > -1.Blend Tree Direction: The
GetUpparameter also acts as the blending factor in a 1D Blend Tree. This blends between different recovery profiles depending on the orientation of the physical ragdoll asset:0: Getting Up Face Up (recovering from lying on the back).1: Standing Up Face Down (recovering from lying on the stomach).
Ragdoll Configuration
While global activation resides in the pedestrian settings, fine-grained physics behaviors are customized locally using PedestrianRagdollConfigAuthoring.cs.
Parameter |
Type |
Description |
|---|---|---|
Recovery Duration |
|
The duration in seconds a pedestrian stays in the ragdoll state before trying to recover. |
Max Distance To Recover |
|
Maximum allowed distance from the initial impact point for the pedestrian to still be eligible for recovery. |
Force To Damage Multiplier |
|
Multiplier used to convert physical collision impact force into health component damage. |
Damage Type Index |
|
The specific damage type index associated with vehicle-pedestrian collisions. |
State Machine Workflow
The underlying logic is driven by TemporaryRagdollStateSystem.cs, which processes active entities based on their current RagdolState:
Default When a ragdoll activation event triggers, the system clears active anti-stuck components, calculates the target
RecoveryTimebased on the config, and disables the default visual skin (deactivating the GameObject or disabling GPU mesh info depending on the rig type). The physical ragdoll instance is then activated.Reactivate Invoked if a pedestrian experiences another impact while recovering. This resets the
RecoveryTimeand forces the physical ragdoll back into full simulation.Temporal The pedestrian is actively simulated as a ragdoll on the ground. The ECS entity’s position tracks the physical ragdoll’s hips. Once the
RecoveryTimeexpires and no active collisions are present, the system runs a safety check. If safe, it triggers the stand-up animation.WaitingForGettingUp Monitors the getting-up animation. Once complete, the physical ragdoll is returned to the object pool, the appropriate visual skin (Hybrid GameObject or GPU rendering) is re-enabled, movement state tags are updated, and control is handed back to standard navigation.
Safety Validation Algorithm
Before a pedestrian transitions out of the Temporal ragdoll state, the system invokes the IsAvailable method to prevent entities from glitching into moving traffic or getting stuck under geometry:
// Spatial safety check against nearby vehicles
float halfWidth = carEntityData.BoundsExtents.x + safetyMargin;
float halfLength = carEntityData.BoundsExtents.z + safetyMargin;

bool isUnderCar = math.abs(localPos.x) <= halfWidth &&
                  math.abs(localPos.z) <= halfLength;
Grid-Based Lookup: The system samples the pedestrian’s flat position against the current cell and 8 neighboring cells within the
CarHashMap.Distance Culling: Vehicles further than a squared distance of 25 units are instantly ignored.
OBB Space Check: The pedestrian’s position is transformed into the vehicle’s local space. If the pedestrian falls within the vehicle’s bounds extents (padded by the safety margin), the recovery is aborted, and the pedestrian remains down until the vehicle passes.
Common Info
Collision
In some cases pedestrians can get stuck in obstacles (vehicles), to solve this problem, adjust the Antistuck config.
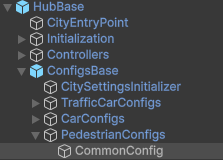
Configs
Pedestrian Spawner Config

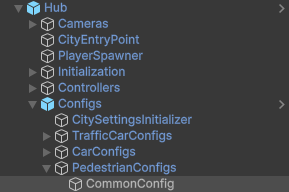
Hub/Configs/PedestrianConfigs/CommonConfig
Pedestrian Settings Config

Hub/Configs/PedestrianConfigs/CommonConfig
Skin Type
Rig show only in view : rig skin will be loaded in the camera’s view area.
Rig show always : rig skin will be loaded when the entity is created and will exist until it is destroyed.
No skin : entities without a skin will be created.
Rig Type
Hybrid legacy : hybrid entity with animator component.
Pure GPU : pure entity with GPU animations.
Hybrid and GPU : mode that allows you to mix Hybrid animator models for near and GPU animation for far at the same time.
Hybrid On Request And GPU : Hybrid skin will be load if PreventHybridSkinTagTag tag is manually disabled by the user for the specific entity, otherwise it will be animated by GPU.
Hybrid Shape GPU : hybrid entity animated on GPU in DOTS & has hybrid monobehaviour collider to interact with pedestrians in a familiar way.
Rukhanka : pure entities animated with Rukhanka Animation System in DOTS.
Rukhanka Hybrid : hybrid entities animated with Rukhanka Animation System with hybrid monobehaviour collider & rigidbody to control or interact with pedestrians in a familiar way.
Animatron : pure entities animated with Animatron system in DOTS.
Animatron Hybrid : hybrid entities animated with Animatron System with hybrid monobehaviour collider & rigidbody to control or interact with pedestrians in a familiar way.
Entity Type
No physics : pedestrian not contains PhysicsShape component.
Physics : pedestrian contains PhysicsShape component.
Common Settings
Obstacle Avoidance Type
Collision type
Calculate : collision is calculated manually (for NoPhysics type).
Physics : collision is calculated with Unity.Physics (for Physics type).
Disabled
NavAgent Config
Config for NavMesh navigating.
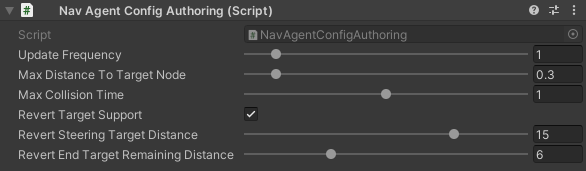
Hub/Configs/PedestrianConfigs/NavAgentConfig
- Revert target supportif steering target is much further than final target with a given value the target will be reverted.
Revert steering target distance : distance to steering target logic for target return.
Revert end target remaining distance : distance to final target logic for target return.
Obstacle Local Avoidance Config
Config for Local Avoidance navigating.

Hub/Configs/PedestrianConfigs/LocalAvoidanceConfig
- Obstacle avoidance method:
Simple : is able to avoid only 1 object.
Find neighbors : multiple objects close to each other are grouped as one (more costly in performance).
Antistuck Config
Anti-stuck config for pedestrians stucked in a collision.

Hub/Configs/PedestrianConfigs/AntistuckConfig
Trigger Config

Hub/Configs/PedestrianConfigs/TriggerConfigs/PedestrianCommonTriggerConfig
- Trigger data:
- Fear Point Trigger :
Impact trigger duration : duration of the trigger on the pedestrian.
Scary Trigger Config
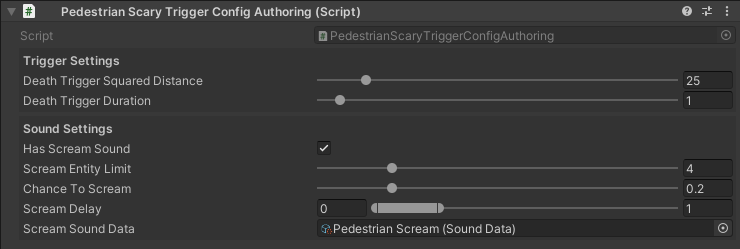
Hub/Configs/PedestrianConfigs/TriggerConfigs/PedestrianScaryTriggerConfigAuthoring
Trigger settings
Sound settings
Bench Config
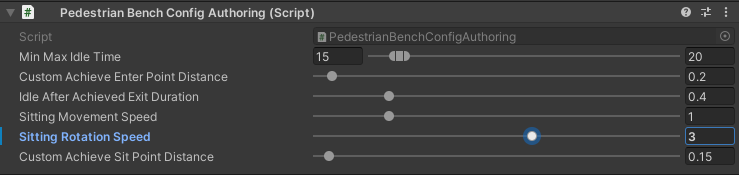
Hub/Configs/PedestrianConfigs/BenchConfig
Common Sound Config
Common pedestrian sound settings

Hub/Configs/PedestrianConfigs/SoundConfig
State Authoring
State Dictionary

Hub/Configs/PedestrianConfigs/PedestrianStateAuthoring
- State type:
Default : the state proccessed by PedestrianStateSystem system (code processing for state should be there PedestrianStateSystem.cs:144).
External system : the state proccessed by external system (code processing for state should be in the separate system).
Additive : additive state flag adds to the current state and is processed by the External system.
Additive any : additive state flag adds to the current state and is processed by the External system & ignores available next state flags.
Movement State Binding Dictionary
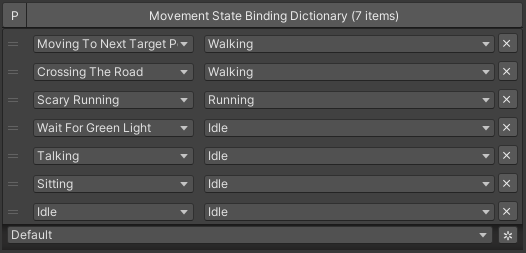
Hub/Configs/PedestrianConfigs/PedestrianStateAuthoring
Contains data - which Movement state is assigned after the Action state is assigned.
Note
Read more the state info & available states.