Aron’s A* Pathfinding project
A* solution can be used for Traffic & Pedestrian navigation as an alternative to the built-in A* solution.
How To Use
Buy & download, import the following asset plugin:
Getting Started
Create a new gameobject & add AstarPath component
Add 2 Point Graph to the AstarPath component (if you are going to navigate for either traffic or pedestrian, create only 1 graph)

Create a new gameobject & AstarPedestrianPathService for pedestrians & AstarTrafficPathService for traffic.

The next step is to create a graph for runtime or static scene.
To retrieve traffic or pedestrians, read the traffic entity selection or Pedestrian entity selection
To get entity nodes on the scenes, read TrafficNodeSelector & PedestrianNodeSelector examples.
After you have added service & graph, use this code:
public class StartPathServiceExample : MonoBehaviour
{
// Reference to pedestrian or traffic path service
[SerializeField] private EntityCustomPathServiceBase pathService;

public void StartPath(Entity entity, Entity endNode)
{
        pathService.SetFollowPath(entity, endNode);
}
}
Static Graph
Used for static scenes created in the Editor.
Add components AstarPedestrianStaticGraph & AstarTrafficStaticGraph & assign these references to corresponding services, making sure local graph indexes are different for both graphs & matched with AstarPath (e.g. 0 index for pedestrian & 1 index for traffic).
Runtime Graph
Used for run-time generated scenes.
Create a new gameobject & add a RuntimeRoadManager component & you can use Runtime Road for demo.
Add components AstarPedestrianRuntimeGraphModifier & AstarTrafficRuntimeGraphModifier & assign these references to corresponding services, making sure local graph indexes are different for both graphs & matched with AstarPath (e.g. 0 index for pedestrian & 1 index for traffic).
Make sure that you have assigned RuntimeRoadManager to these graphs.
- For a quick start follow these steps [optional]:
Open a RuntimeTileRoad Demo scene.
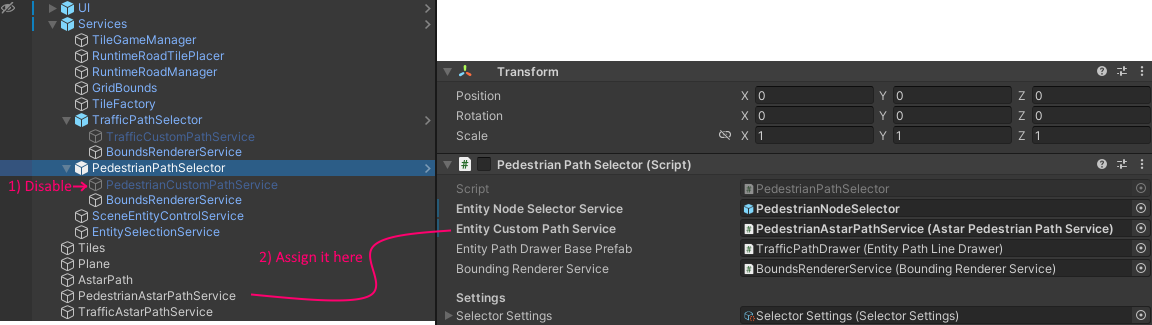
Disable built-in path services & add created path services to corresponding path selectors.
Example for pedestrian:
Do the same for traffic.